Thursday, March 6, 2014
Plans for a Wooden Bench for the Garden or Patio
By [http://ezinearticles.com/?expert=Nico_Marthinus_Ebersohn]Nico Marthinus Ebersohn
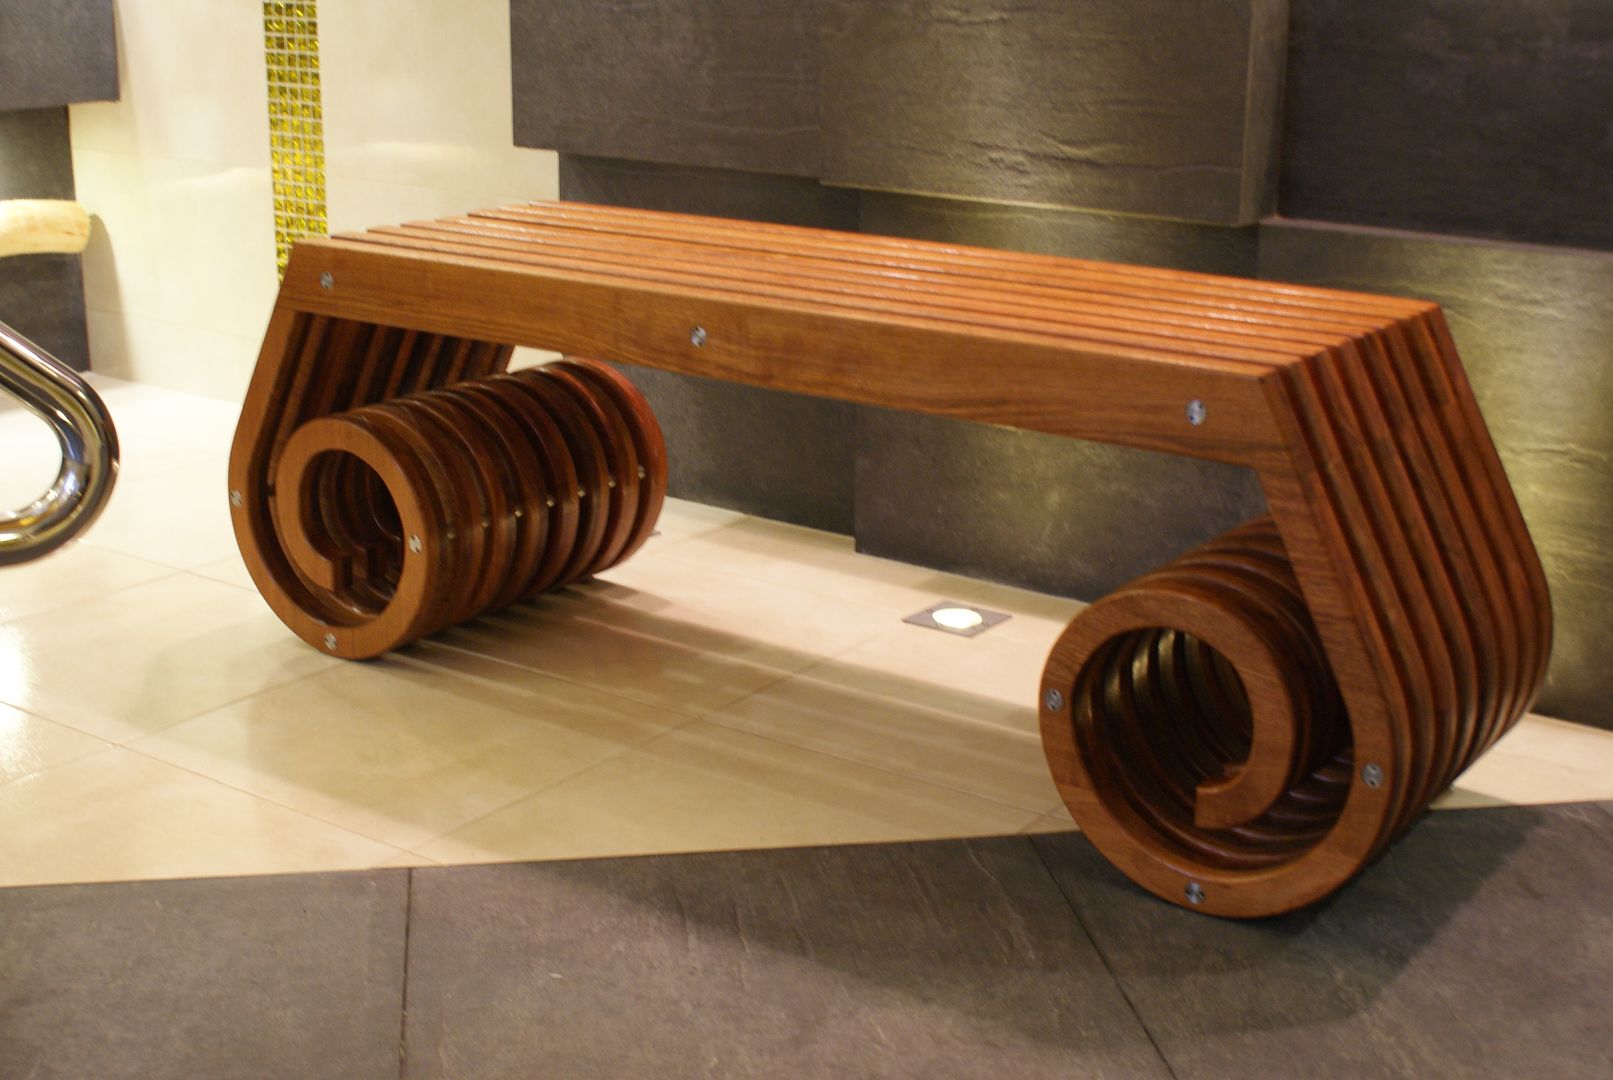
A Wood bench is, as the word says, a piece of furniture thats made out of wood where one and more people can sit on. A wood bench can be used anywhere and for whatever. Many benches have arm and back rests; some have no back rest and can be sat on from either side and come in many shapes and forms.
They can be found in parks, gardens, shopping malls, and outdoor patio or practically anywhere. It all depends where the bench is to see the use of that specific bench. The public usually sits on a bench in the park. It is very interesting to sit on a bench in the shopping mall and watch the people passing by when everyone is busy with his or her own agenda. Benches are often donated by persons or associations, which may then be indicated on it by a small plaque
At the sea or at a scenic nature spot you will find a bench. A person can sit on that bench and just absorb the beauty of nature.
People often add wooden benches in their garden for a focal point or on their patios or under a tree in the garden or anywhere where they think it is necessary to have one. Benches in and around the garden are very useful and can be used for whatever purpose.
A wooden bench can enhance an area and can be used to spice up an area. Lets take a bench at the poolside. It can be used as a decorative item around the pool or can be used by the person that is wanting to suntan next to the pool.
The gardener for resting purposes can also use a wooden bench thats placed somewhere in the garden. Friends can also use a wooden bench to sit on and admire your garden.
Wooden benches are manufactured in different styles and shapes to suit the taste of the owner of that bench. Benches can be manufactured from different types of woods. Benches that are going to be expose to the elements like rain and sun are the best if they are manufactured from wood that can withstand that elements or wood treated against the elements.
One can purchase a bench that is going to add that special focal point or a person can also build his own bench to fill that empty space in the garden or at the pool or on the patio etc. If you are going to build your own make sure that the construction is of good quality and that the right type of wood is used to withstand the elements if the bench are going to be exposed to the heat or cold. If built correctly it will give you years of pleasure just by looking at it.
Wooden benches can add value to a garden or park or any environment if it is placed in the right spot. A person or persons can sit for hours on a wooden bench and let time pass by, admire a garden, solve problems, relax at the poolside, brainstorm an idea or work on a plan of action for the day.
There is a place for a wooden bench in any garden or patio so look around for that perfect spot to put it. So much more satisfaction will be experience if the bench is built by you. It will give you pleasure to tell your grandchildren "I built that garden bench standing under the oak tree", many years ago.
You can also build a wooden bench of your own with [http://www.n-iceman.com/]Easy-To-Follow Instructions
Article Source: [http://EzineArticles.com/?Plans-for-a-Wooden-Bench-for-the-Garden-or-Patio&id=6726162] Plans for a Wooden Bench for the Garden or Patio
Read More..
A Wood bench is, as the word says, a piece of furniture thats made out of wood where one and more people can sit on. A wood bench can be used anywhere and for whatever. Many benches have arm and back rests; some have no back rest and can be sat on from either side and come in many shapes and forms.
They can be found in parks, gardens, shopping malls, and outdoor patio or practically anywhere. It all depends where the bench is to see the use of that specific bench. The public usually sits on a bench in the park. It is very interesting to sit on a bench in the shopping mall and watch the people passing by when everyone is busy with his or her own agenda. Benches are often donated by persons or associations, which may then be indicated on it by a small plaque
At the sea or at a scenic nature spot you will find a bench. A person can sit on that bench and just absorb the beauty of nature.
People often add wooden benches in their garden for a focal point or on their patios or under a tree in the garden or anywhere where they think it is necessary to have one. Benches in and around the garden are very useful and can be used for whatever purpose.
A wooden bench can enhance an area and can be used to spice up an area. Lets take a bench at the poolside. It can be used as a decorative item around the pool or can be used by the person that is wanting to suntan next to the pool.
The gardener for resting purposes can also use a wooden bench thats placed somewhere in the garden. Friends can also use a wooden bench to sit on and admire your garden.
Wooden benches are manufactured in different styles and shapes to suit the taste of the owner of that bench. Benches can be manufactured from different types of woods. Benches that are going to be expose to the elements like rain and sun are the best if they are manufactured from wood that can withstand that elements or wood treated against the elements.
One can purchase a bench that is going to add that special focal point or a person can also build his own bench to fill that empty space in the garden or at the pool or on the patio etc. If you are going to build your own make sure that the construction is of good quality and that the right type of wood is used to withstand the elements if the bench are going to be exposed to the heat or cold. If built correctly it will give you years of pleasure just by looking at it.
Wooden benches can add value to a garden or park or any environment if it is placed in the right spot. A person or persons can sit for hours on a wooden bench and let time pass by, admire a garden, solve problems, relax at the poolside, brainstorm an idea or work on a plan of action for the day.
There is a place for a wooden bench in any garden or patio so look around for that perfect spot to put it. So much more satisfaction will be experience if the bench is built by you. It will give you pleasure to tell your grandchildren "I built that garden bench standing under the oak tree", many years ago.
You can also build a wooden bench of your own with [http://www.n-iceman.com/]Easy-To-Follow Instructions
Article Source: [http://EzineArticles.com/?Plans-for-a-Wooden-Bench-for-the-Garden-or-Patio&id=6726162] Plans for a Wooden Bench for the Garden or Patio
Wednesday, March 5, 2014
Suet Bird Feeder Plans
Several years ago, I developed a set of suet bird feeder plans that were based on some free bird feeder plans I had found on the internet. My son and I built a bird feeder for my wife, my mom, and my mother-in-law for Mothers Day. The problem is that we built them out of inexpensive whitewood. They worked great and looked great, but only lasted a couple of years outside in the wet, winter weather.
Design My son had been bugging me for several months to build new ones, but another problem cropped up. I had lost my original bird feeder plans! So, it was back to the drawing board for a new bird feeder design. We like using suet because it seems to make less of a mess than loose bird seed and doesnt attract rodents.
For the originals we made our own suet, so the feeders werent very large. This time around, I picked up a brick of commercial suet at the store. It was much bigger than the suet we made. So, the bird feeder needed to be big enough to fit a store-bought block of suet.
Material This time, I also wanted them to last longer than only a couple of years. I probably could have done better on the price if Id taken the time to shop, but I picked up a decent piece of 1x6x8 Cedar trim for about ten dollars. The Cedar board was planed smooth on one side only, so we sanded it with 60-grit sandpaper before cutting out the parts.
In the bird feeder plans, I have included a layout for cutting the board. If you follow the layout, you should be able to get two suet feeders out of one 8 board.
Cutting The Parts My brother had borrowed my chop saw and I couldnt find a big enough miter box to cut it by hand. So, I made all my cross-cuts using the miter attachment on my table saw. Since a 1x6 is actually 5 1/2" wide, the back can just be cut to length.
Next, I cut the top to length and then ripped it to the correct width on the table saw. I then ripped the remaining length of wood to 1 1/2" for the bottom and two front pieces.
They were each cut to length and then I moved on to the more difficult end pieces. At this point there should be one piece of wood left that needs to be ripped to 2 1/4" for the ends.
I always have difficulty cutting an angle on the end of a board, while simultaneously cutting the board to a specific length. In this case, I cut the angle such that both end pieces were left a little bit longer than necessary.
Then, I measured from the tip of the angled cut and marked the desired length of the part. I cut to this line and the length came out perfect.
There is a 3/8" hole drilled in the back to hang the feeder on a post or fence. However, we decided to hang our bird feeder from a tree branch. So, we didnt really need the hole.
Assembly Either way, lightly sand all the parts with 100 or 120-grit sandpaper before assembly. We used glue and screws for assembly, but glue and nails will work just as well. If the board is really dry, be sure to drill pilot holes to prevent the wood from splitting.
The order of assembly isnt particularly important, but we found the following helped simplify aligning the parts properly.
First, we attached the back to the bottom with glue and two screws. Next, the ends were attached to the back with glue and two screws each, and to the bottom with only glue.
The lower front piece was attached to the ends with glue and one screw per end. Next, the the upper front piece was attached the same way. This was the only piece we had to measure for during assembly.
Finally, the top was attached to the ends with a couple of screws into each end piece. Thats it. Pretty straightforward.
Drawing File To make some birds in your neighborhood happy, click on the link to the bird feeder plans below. If youd like to download a copy to your computer, right click then "save-as". Either way, youll need the Adobe reader to view the file.
View or Download "Suet Bird Feeder"
Return from Suet Bird Feeder Plans
to Outdoor Woodworking Designs
Click Here and Start WoodWorking
Read More..
Design My son had been bugging me for several months to build new ones, but another problem cropped up. I had lost my original bird feeder plans! So, it was back to the drawing board for a new bird feeder design. We like using suet because it seems to make less of a mess than loose bird seed and doesnt attract rodents.
For the originals we made our own suet, so the feeders werent very large. This time around, I picked up a brick of commercial suet at the store. It was much bigger than the suet we made. So, the bird feeder needed to be big enough to fit a store-bought block of suet.
Material This time, I also wanted them to last longer than only a couple of years. I probably could have done better on the price if Id taken the time to shop, but I picked up a decent piece of 1x6x8 Cedar trim for about ten dollars. The Cedar board was planed smooth on one side only, so we sanded it with 60-grit sandpaper before cutting out the parts.
In the bird feeder plans, I have included a layout for cutting the board. If you follow the layout, you should be able to get two suet feeders out of one 8 board.
Cutting The Parts My brother had borrowed my chop saw and I couldnt find a big enough miter box to cut it by hand. So, I made all my cross-cuts using the miter attachment on my table saw. Since a 1x6 is actually 5 1/2" wide, the back can just be cut to length.
Next, I cut the top to length and then ripped it to the correct width on the table saw. I then ripped the remaining length of wood to 1 1/2" for the bottom and two front pieces.
They were each cut to length and then I moved on to the more difficult end pieces. At this point there should be one piece of wood left that needs to be ripped to 2 1/4" for the ends.
I always have difficulty cutting an angle on the end of a board, while simultaneously cutting the board to a specific length. In this case, I cut the angle such that both end pieces were left a little bit longer than necessary.
Then, I measured from the tip of the angled cut and marked the desired length of the part. I cut to this line and the length came out perfect.
There is a 3/8" hole drilled in the back to hang the feeder on a post or fence. However, we decided to hang our bird feeder from a tree branch. So, we didnt really need the hole.
Assembly Either way, lightly sand all the parts with 100 or 120-grit sandpaper before assembly. We used glue and screws for assembly, but glue and nails will work just as well. If the board is really dry, be sure to drill pilot holes to prevent the wood from splitting.
The order of assembly isnt particularly important, but we found the following helped simplify aligning the parts properly.
First, we attached the back to the bottom with glue and two screws. Next, the ends were attached to the back with glue and two screws each, and to the bottom with only glue.
The lower front piece was attached to the ends with glue and one screw per end. Next, the the upper front piece was attached the same way. This was the only piece we had to measure for during assembly.
Finally, the top was attached to the ends with a couple of screws into each end piece. Thats it. Pretty straightforward.
Drawing File To make some birds in your neighborhood happy, click on the link to the bird feeder plans below. If youd like to download a copy to your computer, right click then "save-as". Either way, youll need the Adobe reader to view the file.
View or Download "Suet Bird Feeder"
Return from Suet Bird Feeder Plans
to Outdoor Woodworking Designs
Click Here and Start WoodWorking
Reader projects
Ive been meaning to post some pictures of projects people have sent me recently. I am always inspired by the creativity of you Mere Mortals.
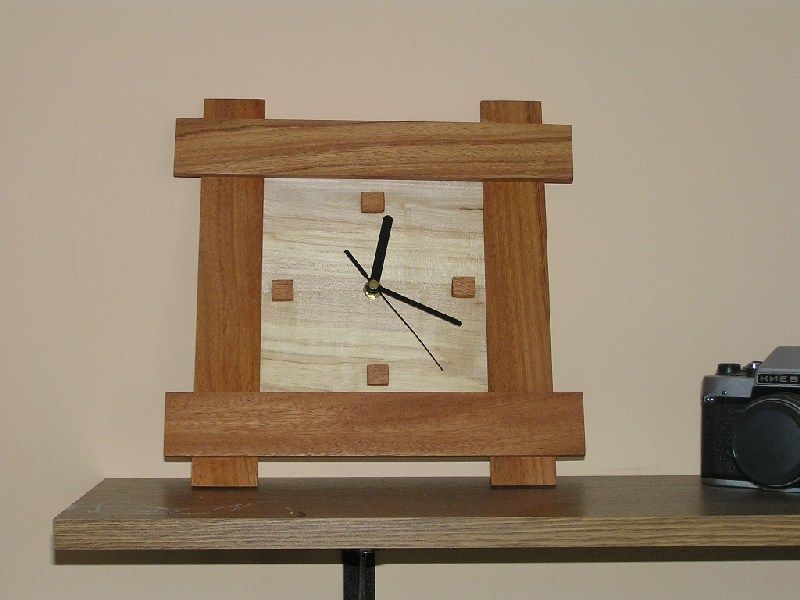
Krzysztof Kleszcz made a number of clocks. I really like this Arts & Crafts design with the unadorned lap joints. Simple and classy.
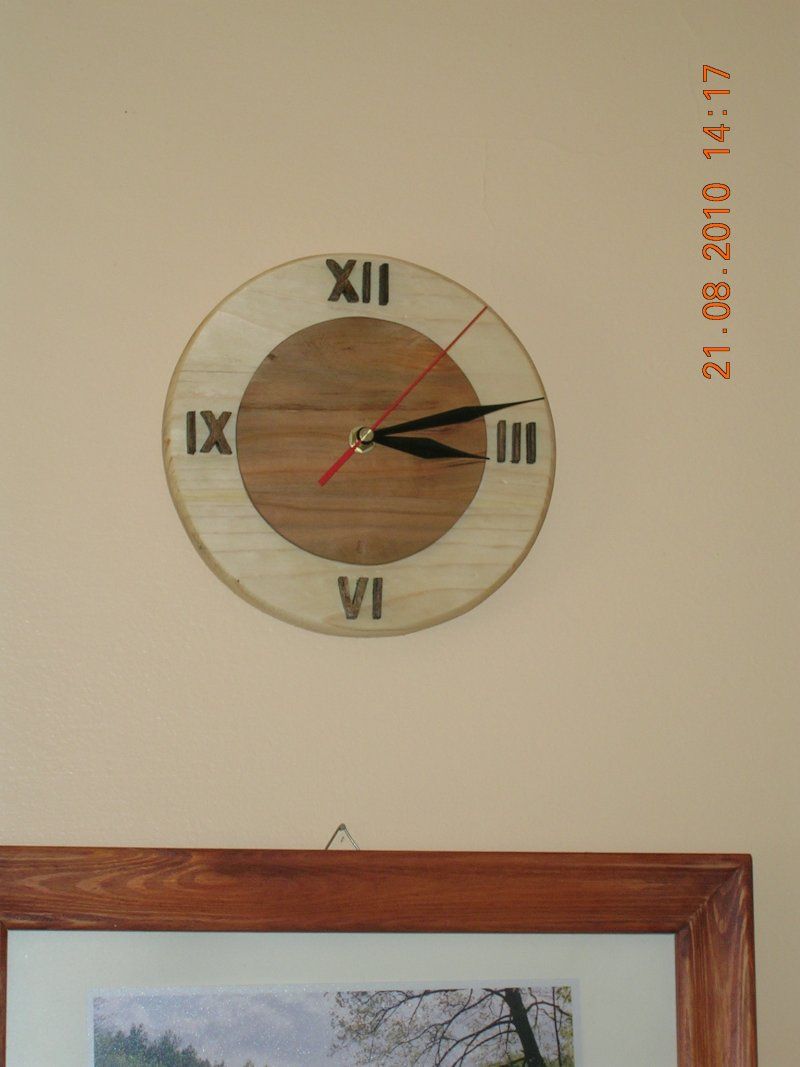
In contrast, heres one that looks almost Deco. Cool stuff.
Nice work guys. More tomorrow.
Read More..
Krzysztof Kleszcz made a number of clocks. I really like this Arts & Crafts design with the unadorned lap joints. Simple and classy.
In contrast, heres one that looks almost Deco. Cool stuff.
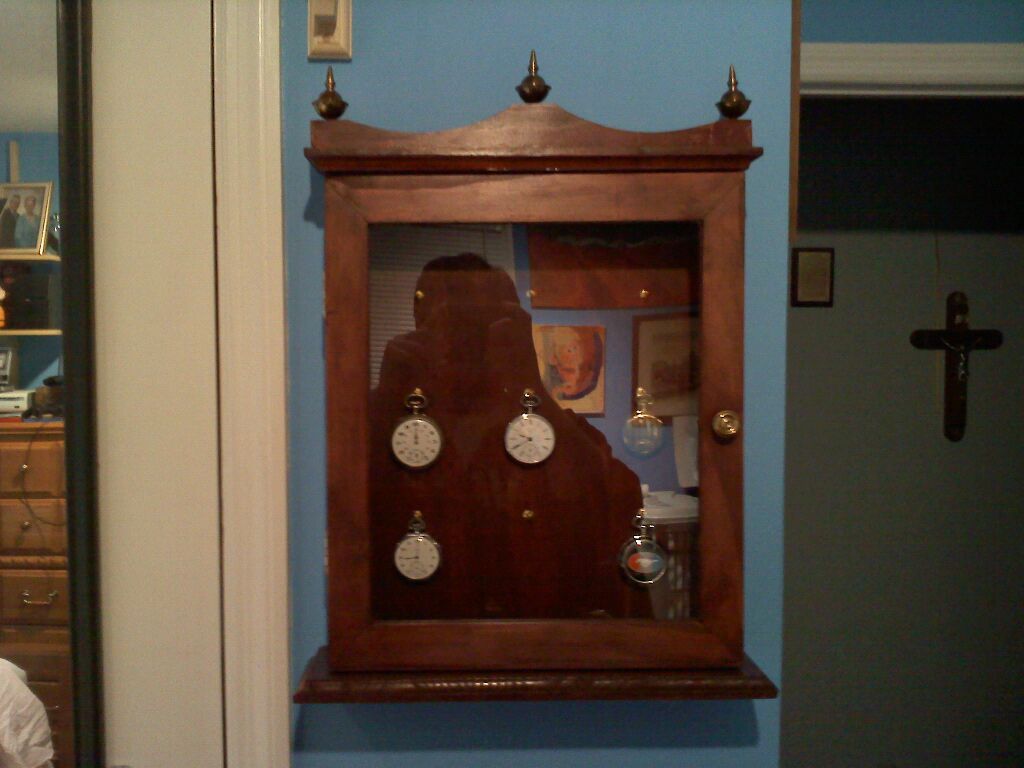
Josh is learning woodworking and spent several months making this watch display with his dad. Ambitious! This is the kind of thing that will become a family heirloom:
Also
As mentioned under a previous post, if you attach a photo found online, you must credit the source/ identify the artist, name of the piece, date, etc.
Read More..
Tuesday, March 4, 2014
Wooden Bowls
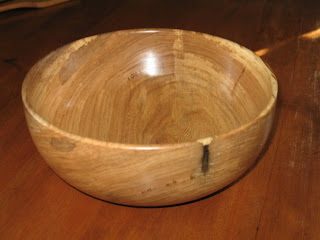
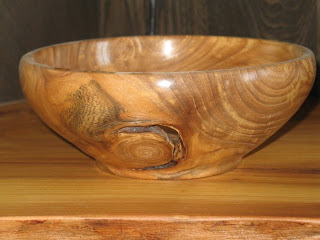


Although I dont get to do it as often as Id like, turning bowls is one of the reasons I got into woodworking in the first place. Here are some examples. The first two are made of Elm that grew on Kings Road, just down the hill from my house. The shallower bowl is made from a Cherry tree I was given a while back. The bark covered bowl is carved from a spruce burl and the small bowl is spalted maple.
George Nakashima

George Nakashima is a mid 20th century modernist that works primarily in black walnut. His table tops consist of very smooth slabs of wood, connected by butterfly joints, with rough natural edges. During his stay in a Japanese internment camp in World War II, he learned traditional Japanese wood working from Gentaro Hikogawa, becoming proficient in the use of traditional woodworking tools and joinery.
Nakashima placed emphasis on the natural qualities of the wood being used and the best way to preserve the spirit of the tree from which the wood came from. Because of this he was often involved in many aspects of fabrication. According to the Nakashima website, a website run by a company that still churns out his designs as well as custom designs modeled after his style after his death, he was often present during the milling process as well as the assembly process. Now his daughter Mira Nakashima has taken up the family business and supervises the milling, fabrication, and design of new pieces. She also has recently started making her own designs dedicated to her mother, which differ slightly from the look of her father’s furniture.

While Nakashima held a degree in Architecture, he did not directly design any buildings but rather worked on a construction consultant for Antonin Raymond who was instrumental in getting him released from the internment camp.
I liked the use of the raw wood but i felt it was too unaturally glossy.
Newest project about to begin!
Well, Ive been pretty busy building some pens and have sold a few so that helps out. I recently bought a new flat panel LED TV so now I need to build a new stand for it. I want to build a stand that the TV will stand on, but that also has room to hold my receiver, cable box, Xbox, PS3 and DVDs/Games. So, one day I decided to browse through the Pottery Barn catalog and see what they had and found exactly what I was looking for:
http://www.potterybarn.com/products/hudson-large-media-console/?pkey=cmedia-stand-flat-screen-display
This design is exactly what I need; TV sits on top, there is room for all the accessories as well as media storage on the sides. I also like that you can close the whole thing up if you want, when not in use. This will be the first cabinet Ive built that has pocket doors too so that should be interesting.
This piece is going to be made out of Walnut, which I havent used since my first piece which was the blanket chest, so Im looking forward to that. Since Christmas is just a few days away, and New Years just after that, Im not exactly sure when I will get started, but I may buy the wood after Christmas so that it can acclimate in the shop and then I can get started right after the new year; should be a nice way to ring in the new year! So join me around that time frame for the design and build along. Im always eager to learn so input is always welcome!
Merry Christmas and a Happy New Year to you and your family!
Be Safe!
Read More..
http://www.potterybarn.com/products/hudson-large-media-console/?pkey=cmedia-stand-flat-screen-display
This design is exactly what I need; TV sits on top, there is room for all the accessories as well as media storage on the sides. I also like that you can close the whole thing up if you want, when not in use. This will be the first cabinet Ive built that has pocket doors too so that should be interesting.
This piece is going to be made out of Walnut, which I havent used since my first piece which was the blanket chest, so Im looking forward to that. Since Christmas is just a few days away, and New Years just after that, Im not exactly sure when I will get started, but I may buy the wood after Christmas so that it can acclimate in the shop and then I can get started right after the new year; should be a nice way to ring in the new year! So join me around that time frame for the design and build along. Im always eager to learn so input is always welcome!
Merry Christmas and a Happy New Year to you and your family!
Be Safe!
Monday, March 3, 2014
Bandsaw boxes and a microwave cajon!
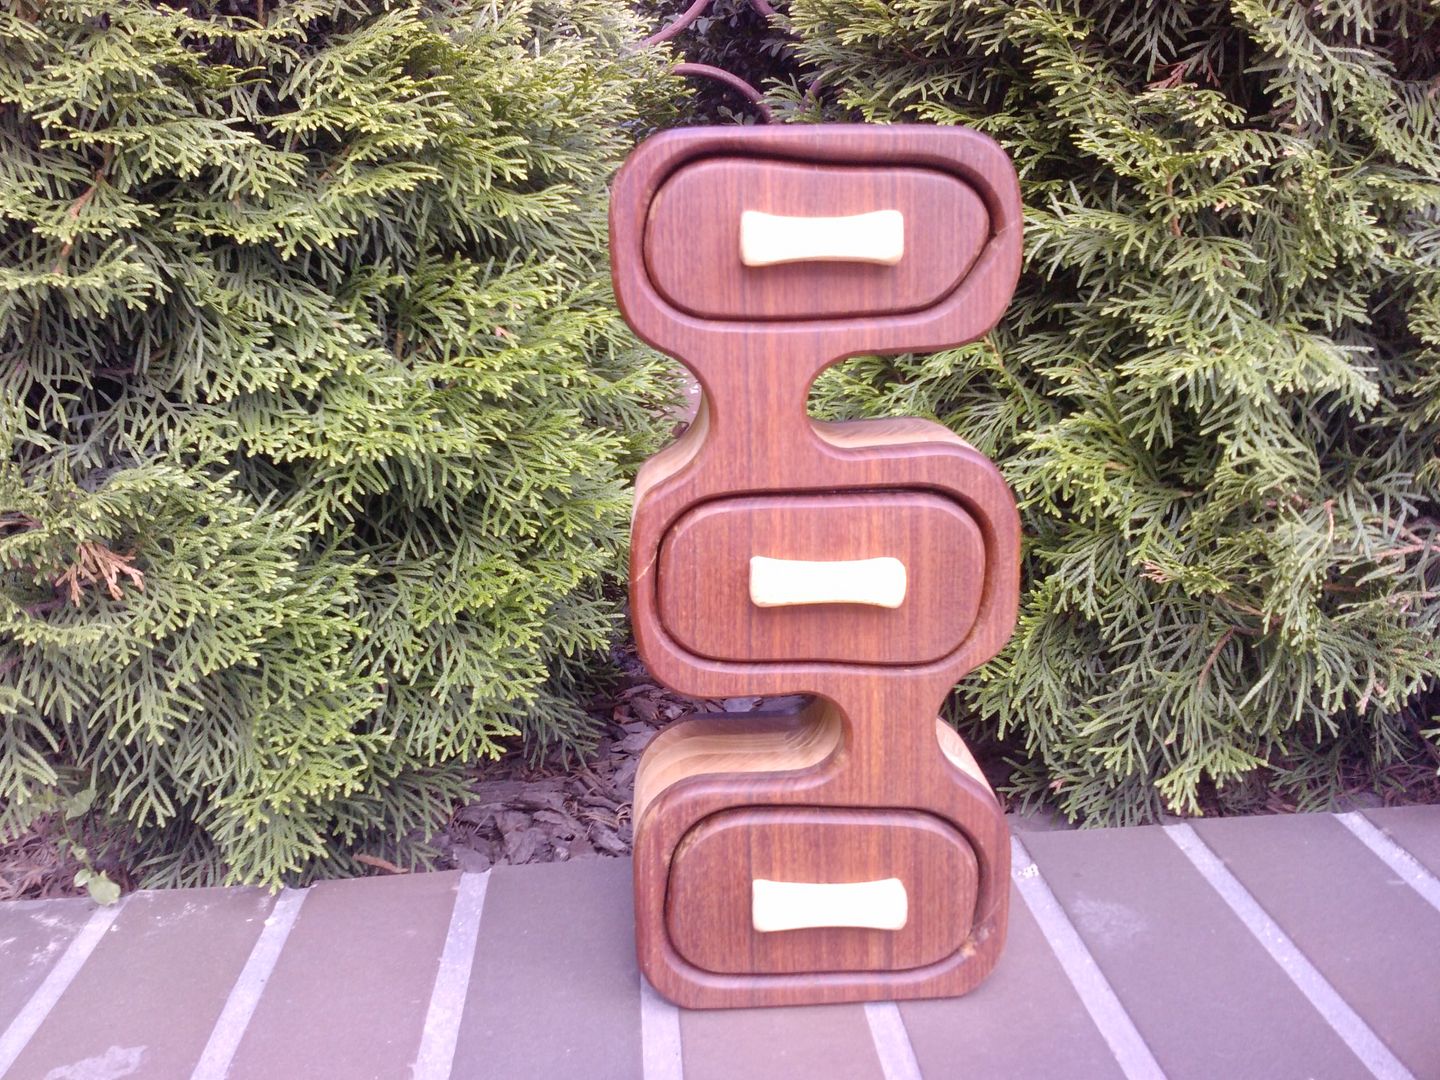
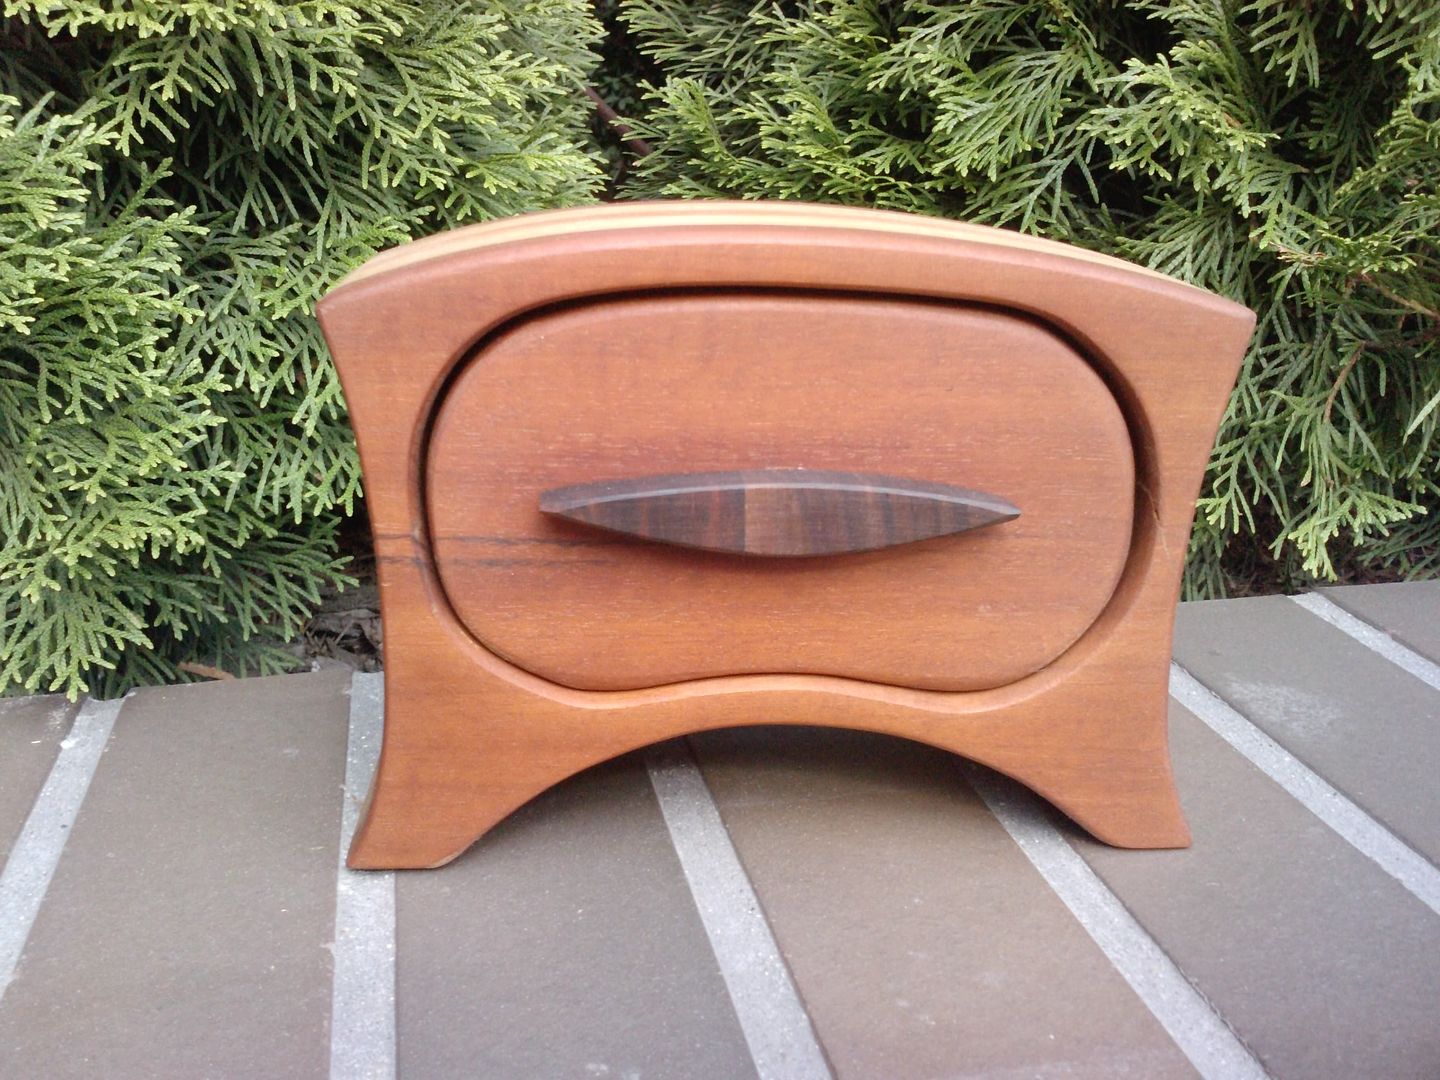
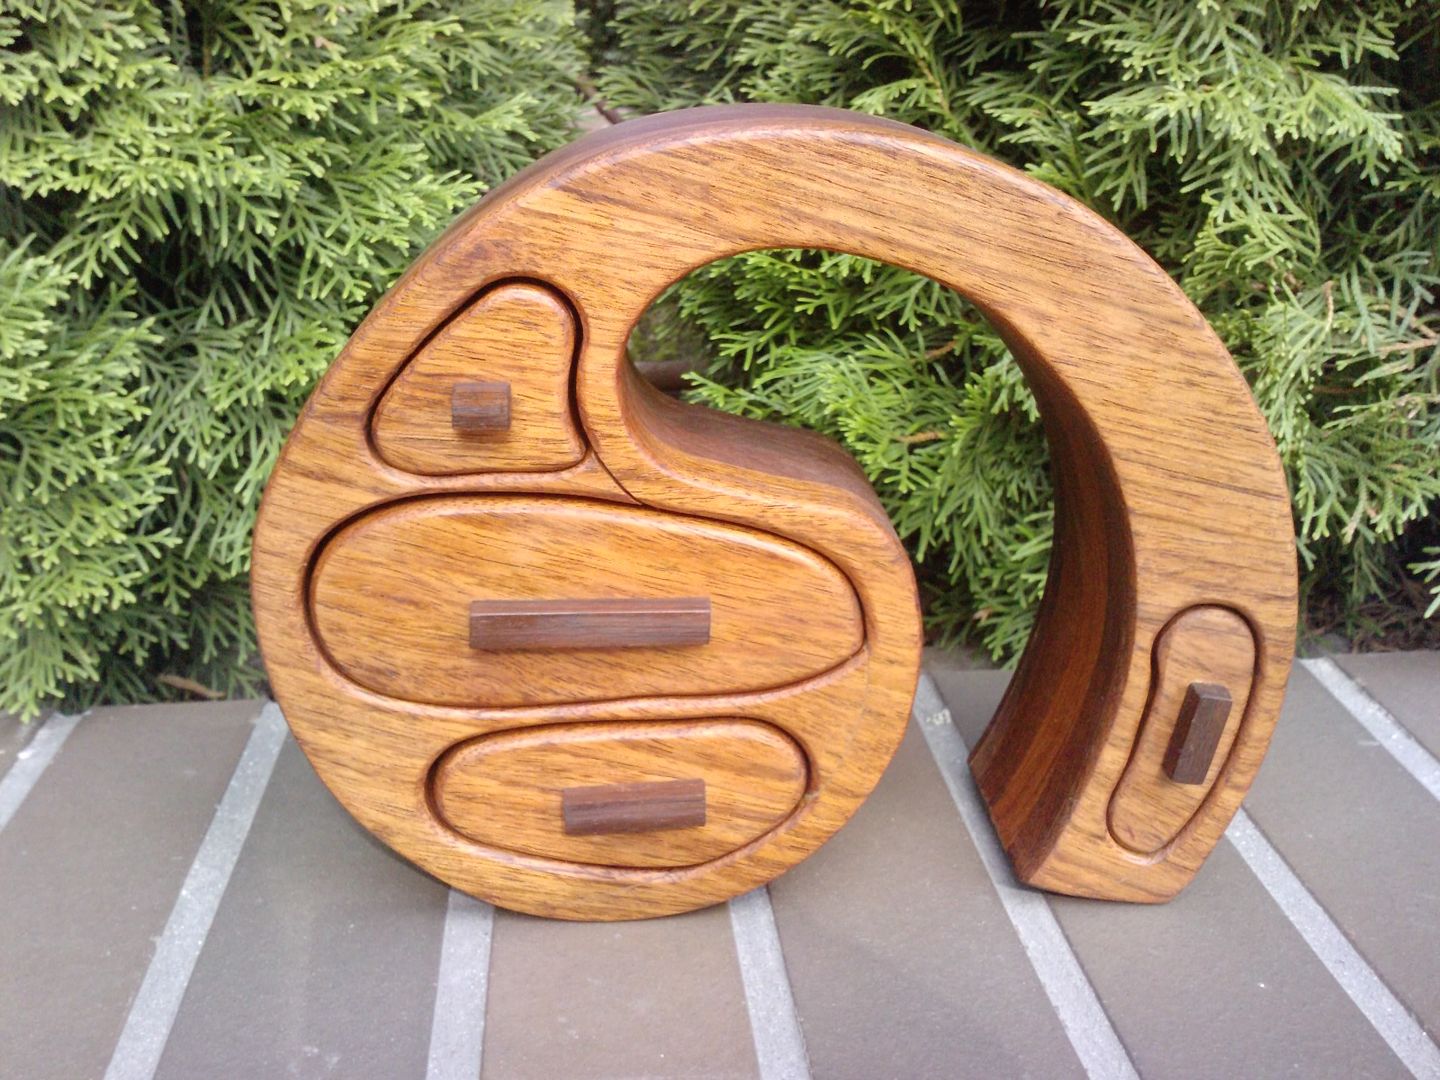
Andrzej Jankowski sent me some photos of some outstanding boxes he made. I am always intrigued by how creative people get making bandsaw boxes.
Read More..
This one is my favorite. It just flows.
He made it using leftover wood from this bench. Thanks Andrzej. You are one creative guy.
****
Microwave Cajon!
Well now I may make another cajon. Timely, since my old microwave oven just broke and is still sitting in my driveway. Paddy Uglow is a musician who created this:
2010 Mere Mortals recap
 Hi everyone!
Just wanted to take some time to thank you all for watching my videos and following this blog over the past year. This is my final video for the year: number 49. Wow. I really had no idea I shot that many.
 |
| From Laney Shaughnessy |
That has kept me — for the most part — focused this past year, and I intend to continue as best as I can in the year to come.
Some things I would like to see happen in 2011:
- I want to make a concerted effort to try to respond to all my email. I really feel awful when you guys send me a note and I let it drop down deep into my inbox. Its bad form, and I am going to try hard to improve.
- I want to try to Tweet and Facebook more. I am still trying to get a grasp on social networking and want to, well, get more connected to you all.
- Id like to get more of you involved in Mere Mortals. I think its pretty cool when people send me pictures of their projects. If you have completed something you are proud of, send it to me. If you can include a description, or tell us about it, that would be great.
- If you have something cool to say, I am totally open to guest bloggers. Maybe an interesting technique youve discovered? Have a strong opinion on something woodworking related? Send me a well-written article and Ill probably post it.
- Let me know what you would like to see on this web site or projects you would like to see me attempt. Remember: keep it simple. We are all just mere mortals in my workshop.
So thanks for supporting this site, guys. And lets make 2011 a great year!
Sunday, March 2, 2014
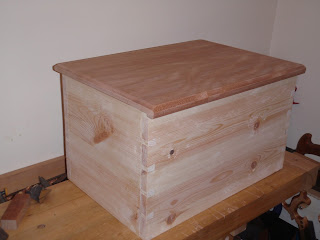
Small Pine Chest
This posting was started on the 10th November and has been written as the project progressed... Instead of getting stuck into the project until completion, I had a week where I was busy with other things.
---
A few days ago I finally decided I need to pluck up some courage and have a go at Dovetails...
---
A few days ago I finally decided I need to pluck up some courage and have a go at Dovetails...
I also need to make a tool chest at some point, therefore, the decision was made to build a smaller practise chest first.
I had a few lengths of budget B-grade Pine 18mm thick and 144mm wide which is really knotty but will (hopefully) do the job. Being my first attempt at dovetails, there is a good chance Im gonna screw up, so no point in wasting good wood - right?
I also have the remains of what looks like a Mahogany desk top with which to make a lid - if I even get that far!
I also have the remains of what looks like a Mahogany desk top with which to make a lid - if I even get that far!
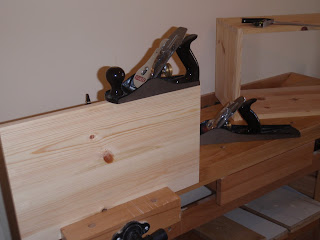
First job was to roughly cut the pine boards to length and glue them together to make wider boards. After glueing I cut them to exact length and made sure they were all square with my shooting board and no#6 plane.
2 sides, a front and back and a bottom piece that hasnt been cut to any specific size yet.
Before laying out the joinery, I thought it best to practice laying out dovetails on a scrap piece of wood using instructions from a book. I wanted to layout the pin & tail spacings using dividers but each time i ended up with incorrect spacings. I even got my girlfriend involved to check my sanity following the instructions line by line and still the method didnt work. Finally I resorted to looking up Dovetail layout on good ol Google.
Ah ha!!!!... The book instructions were wrong! Printing or proof reading error perhaps - who knows, at least I was back on track and could now confidently layout dovetails on the chest. I could have just used common sense but wanted to learn properly - by the book so to speak.
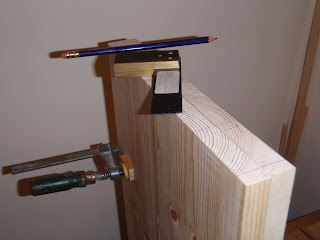
Marking out my tail boards first, both boards together to save some time.
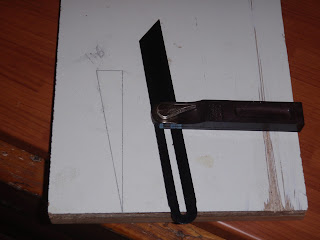
I set my bevel gauge to a 1:6 as recommended for softwoods. I think they look nicer than 1:8 dovetails as well so this will probably be my default setting if I decide to make a dovetail jig.

Front & Back boards tails all marked out and ready for cutting - X marks the waste.

Tails cut. Chopping out the waste from the tails boards was nice and easy and pretty straight forward, taking care to preserve the baseline. I took a lot of time ensuring my cutting was accurate but realised afterwards its the accuracy of the pins that makes a tight joint as these come from the tails.

My bench isnt the most solid thing in the world so I used a huge butchers block on my saw bench so I could sit astride it and chop out the pins. These took a lot longer as my tails were pretty big and I was using a much bigger chisel.
There we go... My first ever Dovetails!!! One corner done another three to go...

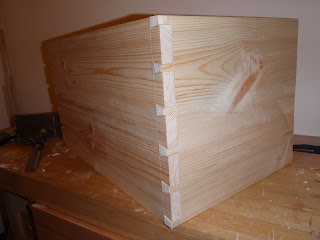
Its starting to look like a box ...
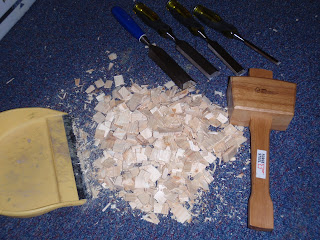
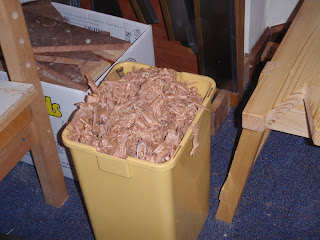
After a lot of chopping, a big pile of wood chips and worrying about the neighbours complaining about the banging...
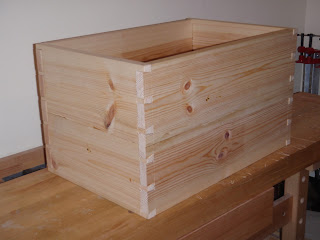
I have a dovetailed box carcass. While the joints certainly are not perfect by any means they look OK and will be even better with some glue. They do look real purdy...I think so anyway.
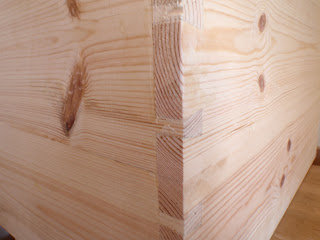
A close up of the Dovetails after gluing. The expanding glue makes them positively tight and decent looking. I wish I had used better quality wood now as this was supposed to be a practice project. They will look even better when I do a final finish.
Time to make a bottom for it...
I planed the bottom board for a nice snug fit. I do not own a plough plane yet and decided to simply glue this bottom panel inside the carcass. In modern glue we trust!. I may also add some screw or nails.
Before gluing in the bottom panel, I rubbed glue in to the end grain to seal it and better protect against a dry joint.
The Titebond Polyurethane glue is strong stuff and fills out any joinery imperfections nicely, but its messy and sticky stuff to use. Its also hard to clean up the squeeze out once dry. The nail varnish remover makes cleaning and unsticking hands a lot easier.

Good squeeze out all around the bottom panel.
At this stage aside from cleaning up and finishing, the carcass is almost complete.
Time to focus on the lid...
The lid is made from a piece mahogany which was given to me by a friend. I believe it was part of an old school desk or side bench. As you can see its covered in glue and paint and God Knows What! . Also shown is the small lip on one side which is about 3/4" wide by 1/4" high, which I have decided to keep and use in the final design - Im making this up as I go!
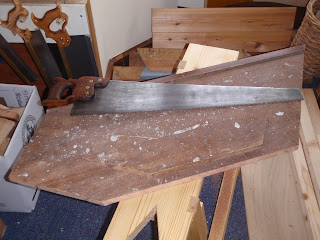
Its such a nice feeling making accurate cuts using sharp panel saws on a proper saw bench. The saw shown is my favourite 26" monster at 5ppi rip.

Ok ... we have a (very) basic square(ish) lid, it needs a lot more refining...

Removing the saw marks and squaring the lid - End grain first.
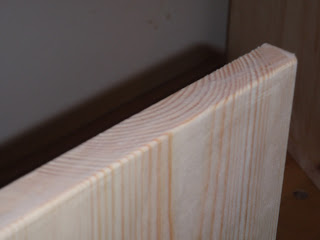
Removing the old finish, paint and grime... I then chamfered all the top edges to make what I believe is called a raised panel. The Mahogany handles so much nicer than Pine, I wish I had more of this stuff!
Lots of shavings later.... Nice red stuff instead of the usual white.
Unfinished Pine is so anaemic...
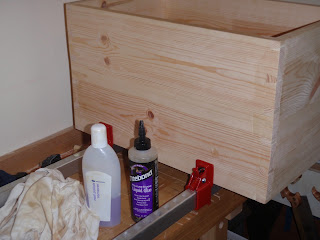
We have an almost completed chest. I have had a nightmare with tearout while trying to finish the pine carcass. Using sandpaper helps but seems a cop out. I think I am going to buy a cabinet scraper which should be able to better handle difficult wood such as this knotty Pine. I also need to buy a hinge for the lid.
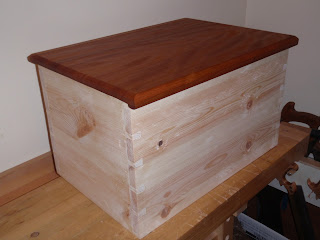
Impatience! I couldnt wait and wanted to see the final finish of the lid. Here it is with a single coat of boiled Linseed oil. I will add more once the carcass is finished properly.
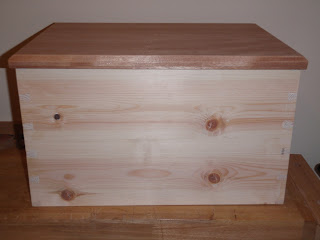
Ok... Final sanding done and a couple of coats of Linseed oil applied... Aside from fitting a hinge for the lid - Im gonna call it ... Done!
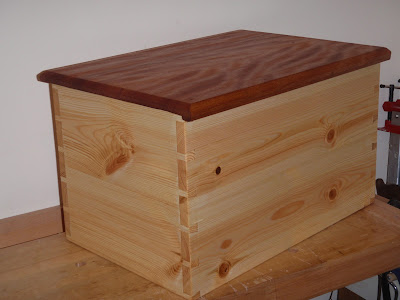
I have to say for a first attempt at dovetail joinery I am very happy with the result. I only really messed up one half pin on the back side at the bottom where I undercut the baseline slightly - it wont really show. The rest of the joints are quite tight. I really wish I had started with clearer, less knotty wood - oh well, I guess they add character.
Due to other commitments, my week away from the project meant I mentally turned off and lost interest and motivation.. Once again I found myself racing to finish it due to impatience and my weak point is finishing. If I continue to use Pine then I think a cabinet scraper (already ordered) will be the way forward, especially as I hate sanding and the dust it creates in the house. I resharpened the plane blade, made the mouth smaller, played with the chip breaker, skewed the blade and still got lots of tear out. Practice practice practice....
I make sure that when I butt joint the two boards together, the cup of the grain runs in opposite directions to minimise wood movement. So ... what is the best way to plane jointed boards when the grain of the two boards runs in opposite directions?
All in all another great learning exercise and a good confidence builder, and ... I can add another joint to my repertoire!
Im really keen to have a go at a full size tool chest soon.
A Handmade Bread Board

Hello, friends. I hope you are all doing well.
Like you, my heart is breaking for the lost lives in CT. All weekend my thoughts and prayers have been with the parents, the teachers, the families, all those affected by the tragedy. Every time I think about what each parent must be going through right now, I am blinking back tears and mourning.

This afternoon while everyone was napping, I went into the kitchen and started some bread. While I listened to the gentle rain outside, I felt so very thankful for my two little girls, tucked safely in their beds. There is not a second that goes by that I am not thankful for them, but it is certainly times like this were reminded to hug those we love a little tighter.

When Jillian woke up we thought wed put together a light Sunday supper of bread, fruit and cheese to nibble on.

We enjoyed corralling everything together on this bread board that Justus made for me yesterday. We had some old barn wood planks laying around and one of them was just the perfect width to use for making one.

I love the patina of the old wood and the fact that it was made with a loved ones hands. I know Ill treasure it forever.

Yesterday I took some photos of Justus making the bread board... its really quite simple if you have the tools (or at least it looked it from my end - smile) and it doesnt matter if it isnt perfect... to me that just adds to its appeal.

(I am glad with the rain today that we spent plenty of time outside yesterday playing... I love Saturdays with my sweet family.)

Justus measured the plank to desired dimensions and cut with a jigsaw. He was concerned that the board wasnt perfect, but I assured him that it didnt matter one bit to me.

Then he sanded the board until it was very smooth and applied a butcher block oil. You can see here that the plank originally might have had some water damage.

We used this butcher block oil by Watco, which is completely food safe. I plan to use this on my butcher block countertops here soon too.

We simply followed the instructions on the back of the oil and rubbed it in with a soft, clean cloth. The oil darkens the wood beautifully and shows its wonderful character.
Subscribe to:
Posts (Atom)