Sunday, March 2, 2014
Small Pine Chest

This posting was started on the 10th November and has been written as the project progressed... Instead of getting stuck into the project until completion, I had a week where I was busy with other things.
---
A few days ago I finally decided I need to pluck up some courage and have a go at Dovetails...
---
A few days ago I finally decided I need to pluck up some courage and have a go at Dovetails...
I also need to make a tool chest at some point, therefore, the decision was made to build a smaller practise chest first.
I had a few lengths of budget B-grade Pine 18mm thick and 144mm wide which is really knotty but will (hopefully) do the job. Being my first attempt at dovetails, there is a good chance Im gonna screw up, so no point in wasting good wood - right?
I also have the remains of what looks like a Mahogany desk top with which to make a lid - if I even get that far!
I also have the remains of what looks like a Mahogany desk top with which to make a lid - if I even get that far!
First job was to roughly cut the pine boards to length and glue them together to make wider boards. After glueing I cut them to exact length and made sure they were all square with my shooting board and no#6 plane.

2 sides, a front and back and a bottom piece that hasnt been cut to any specific size yet.
Before laying out the joinery, I thought it best to practice laying out dovetails on a scrap piece of wood using instructions from a book. I wanted to layout the pin & tail spacings using dividers but each time i ended up with incorrect spacings. I even got my girlfriend involved to check my sanity following the instructions line by line and still the method didnt work. Finally I resorted to looking up Dovetail layout on good ol Google.
Ah ha!!!!... The book instructions were wrong! Printing or proof reading error perhaps - who knows, at least I was back on track and could now confidently layout dovetails on the chest. I could have just used common sense but wanted to learn properly - by the book so to speak.

Marking out my tail boards first, both boards together to save some time.

I set my bevel gauge to a 1:6 as recommended for softwoods. I think they look nicer than 1:8 dovetails as well so this will probably be my default setting if I decide to make a dovetail jig.

Front & Back boards tails all marked out and ready for cutting - X marks the waste.

Tails cut. Chopping out the waste from the tails boards was nice and easy and pretty straight forward, taking care to preserve the baseline. I took a lot of time ensuring my cutting was accurate but realised afterwards its the accuracy of the pins that makes a tight joint as these come from the tails.

My bench isnt the most solid thing in the world so I used a huge butchers block on my saw bench so I could sit astride it and chop out the pins. These took a lot longer as my tails were pretty big and I was using a much bigger chisel.

There we go... My first ever Dovetails!!! One corner done another three to go...

Its starting to look like a box ...
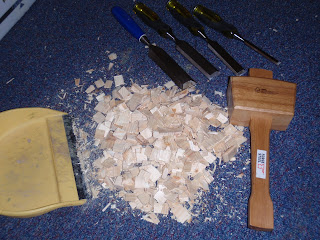
After a lot of chopping, a big pile of wood chips and worrying about the neighbours complaining about the banging...

I have a dovetailed box carcass. While the joints certainly are not perfect by any means they look OK and will be even better with some glue. They do look real purdy...I think so anyway.

A close up of the Dovetails after gluing. The expanding glue makes them positively tight and decent looking. I wish I had used better quality wood now as this was supposed to be a practice project. They will look even better when I do a final finish.
Time to make a bottom for it...

I planed the bottom board for a nice snug fit. I do not own a plough plane yet and decided to simply glue this bottom panel inside the carcass. In modern glue we trust!. I may also add some screw or nails.

Before gluing in the bottom panel, I rubbed glue in to the end grain to seal it and better protect against a dry joint.

The Titebond Polyurethane glue is strong stuff and fills out any joinery imperfections nicely, but its messy and sticky stuff to use. Its also hard to clean up the squeeze out once dry. The nail varnish remover makes cleaning and unsticking hands a lot easier.

Good squeeze out all around the bottom panel.
At this stage aside from cleaning up and finishing, the carcass is almost complete.
Time to focus on the lid...

The lid is made from a piece mahogany which was given to me by a friend. I believe it was part of an old school desk or side bench. As you can see its covered in glue and paint and God Knows What! . Also shown is the small lip on one side which is about 3/4" wide by 1/4" high, which I have decided to keep and use in the final design - Im making this up as I go!
Its such a nice feeling making accurate cuts using sharp panel saws on a proper saw bench. The saw shown is my favourite 26" monster at 5ppi rip.

Ok ... we have a (very) basic square(ish) lid, it needs a lot more refining...

Removing the saw marks and squaring the lid - End grain first.

Removing the old finish, paint and grime... I then chamfered all the top edges to make what I believe is called a raised panel. The Mahogany handles so much nicer than Pine, I wish I had more of this stuff!

Lots of shavings later.... Nice red stuff instead of the usual white.

Unfinished Pine is so anaemic...

We have an almost completed chest. I have had a nightmare with tearout while trying to finish the pine carcass. Using sandpaper helps but seems a cop out. I think I am going to buy a cabinet scraper which should be able to better handle difficult wood such as this knotty Pine. I also need to buy a hinge for the lid.

Impatience! I couldnt wait and wanted to see the final finish of the lid. Here it is with a single coat of boiled Linseed oil. I will add more once the carcass is finished properly.
Ok... Final sanding done and a couple of coats of Linseed oil applied... Aside from fitting a hinge for the lid - Im gonna call it ... Done!

I have to say for a first attempt at dovetail joinery I am very happy with the result. I only really messed up one half pin on the back side at the bottom where I undercut the baseline slightly - it wont really show. The rest of the joints are quite tight. I really wish I had started with clearer, less knotty wood - oh well, I guess they add character.
Due to other commitments, my week away from the project meant I mentally turned off and lost interest and motivation.. Once again I found myself racing to finish it due to impatience and my weak point is finishing. If I continue to use Pine then I think a cabinet scraper (already ordered) will be the way forward, especially as I hate sanding and the dust it creates in the house. I resharpened the plane blade, made the mouth smaller, played with the chip breaker, skewed the blade and still got lots of tear out. Practice practice practice....
I make sure that when I butt joint the two boards together, the cup of the grain runs in opposite directions to minimise wood movement. So ... what is the best way to plane jointed boards when the grain of the two boards runs in opposite directions?
All in all another great learning exercise and a good confidence builder, and ... I can add another joint to my repertoire!
Im really keen to have a go at a full size tool chest soon.

Subscribe to:
Post Comments (Atom)
No comments:
Post a Comment